Following a post in another thread, I've been directed to post here.
Stacking - you all know how it improves Macro, but it has a huge impact on Astro work too, but in a different way.
Macro stacking gives you more DoF, but stacking for the Moon is all about contrast, detail and removing noise.
Digital sensors don't like black, they don't like a lack of contrast, and they generally generate noise which messes with the quality of the image.
Stacking compares frames and looks for random differences between shots (the noise you don't want) and the consistent detail you want to keep or enhance, like shadow around the craters.
Take some test shots and work out the correct exposure settings, then stick the camera on motordrive, all settings on Manual so they don't change and fire off about 20 frames, all the same
Now you need slightly different software for this type of stacking. I use 'Autostakkert3' which is designed for the job (and free) www.autostakkert.com
There are a few tutorial videos out there and lots of options in the software, but essentially for your first try...
1. Make sure the images are JPG or TIFF. Click OPEN, browse for your files (make sure to select Image Files as the type, it defaults to look for video)
2. Once loaded select ANALYSE and it compares frames and does some computation
3. Click on the second window which has the preview of the Moon. Towards the bottom is a button called 'Place AP grid' - click it and it loads the reference grid and markers on objects like craters which it uses to align the other frames against.
4. Go back to the first window and click on STACK
Like with macro stacking, it might take a while if there's a lot of resizing and moving to do to align images, especially if your PC is low on resources.
The output file is now ready. It may be perfect but you'll probably need to have a play in Photoshop to adjust the contrast etc
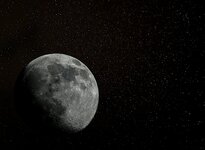
Below is taken with Canon 1Dx and 300mm prime lens, plus 1.4x and 2x extenders (840mm), plus a crop too
It's a 20 shot stack as above, each frame was 1/800 @f/8 ISO640
Next I used GIMP2 (like Photoshop) to adjust the contrast and brighten a little. Finally I added a background layer of stars. Although it's a composite, the stars are of the same area of sky taken a few weeks later after the Moon had moved on, so it's technically correct and I think looks better than just a black background

